Ashley’s Vegan (Gluten-Free) Wedding Cake
By Rissa Miller
The sensation of falling, hurtling through time and space, and landing… in chocolate. The silky fondant surface mashed into my cheeks and eyes. The aroma of decadent dark cake and peanut butter crowding out the gasps of people around me…
I snapped awake, heart pounding, cold sweat soaking my hair. Another anxiety dream about Ashley’s wedding cake. Grabbing my phone from the bedside, I saw it was 3am and still one week away. In a few days, though, I would begin the four-day process of baking, assembling, and decorating a vegan wedding cake for my friend Ashley and her soon-to-be husband David. I’m willing to bet that I was more nervous than the bride, groom or any member of their families.
Rewind nine months from June to Halloween, my favorite holiday. I decided to make a fancy, spooky cake to take to a friend’s party. Because I love baking experiments, this occasion was fun. I made a four-layer cake with black cocoa – a new ingredient to me. Each bite was the richest raven tone, moist and chocolatey. Instead of usual frosting, I made peanut butter candy filling and folded in chopped vegan peanut butter cups for the layers between the cakes. It was Halloween, after all, and even a dessert should be wicked. After a thick layer of chocolate ganache set on the cake, I melted vegan marshmallows and pulled them into long sticky strands, wrapping the concoction in what looked like cobwebs.
When putting the cake together, I placed a two inch plastic spider into the candy layer. My intention was to make the cake itself into a game, like a Mardi Gras King Cake. A rhyme was placed next to the cake plate and whoever found the spider was to get a prize. But my spider’s web did not catch a winner that night… instead, it snared me in the success of my own creation.
Longtime friend Ashley was in attendance and moments after my cake was selected as “best dish” at the party, she approached, told me she loved the cake, and asked if I could recreate it as her wedding cake. I’m pretty sure I laughed out loud. I’m not a professional baker, I didn’t use a recipe, and the pressure of making a wedding cake – the centerpiece of a couple’s reception and a family’s time-honored, treasured dessert – was well outside my wheelhouse. I declined.
Ashley was not deterred, however. She continued to ask me to make her cake over and over and finally, three months later, I agreed to try and make the cake, but only if she had a plan B, in case I failed on the day-of. Vegan/gluten-free baking has its challenges, plus a wedding cake needs to be gorgeous and delicious. Since most of her guests were neither vegan nor gluten-free, an extra coating of stress was rolled on. I really didn’t want people saying things like “Oh, it’s not bad for being vegan/gluten-free.”
Taking meticulous notes, I made the cake four more times over the spring to refine the recipe. Luckily, I know a hungry vegan running team, and they ate all the samples for me – thank goodness! They were also great with feedback on the texture, flavor, and crumb of the cakes.
Despite all this work and preparation, my anxiety persisted. As a former wedding photographer, I knew firsthand the myriad things that could go wrong with a cake. One variation to the baker’s chemistry and the entire thing could taste like a chocolatey sand blob. In hot weather, cakes can sweat and collapse. Then there is the dreaded dropped wedding cake – no Halloween fright can compare to the horror of watching a stunning wedding cake topple to the ground. No matter how carefully I checked my notes, supplies and lists, the dreams came. Nightmares of my beautiful creation flopped onto the dance floor or in the lawn just moments before Ashley and David were supposed to cut in, their traditional first task as a couple.
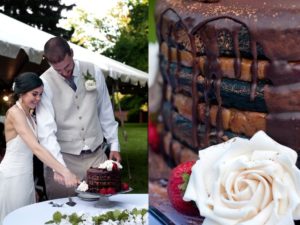
The hard work and planning paid off though. With Ashley’s mom Denise, as well as four dogs and a cat, keeping me company (i.e., keeping me calm), I made the cake in a four day process. It was transported via my husband’s Prius and adorned the reception with a stunning chocolate centerpiece. From the edges of the tent, I quietly observed as guests cleaned their plates – despite the vegan/gluten-free status – and yes, I even saw one man lick his cake plate. That’s kind of an awesome compliment.
Additional acquaintances have since asked if I would bake wedding or birthday cakes for them, but the answer is firmly no. I tasted the sweetness of success this time, however, the lost sleep and anxiety were more pressure than I am interested in reliving. There are wonderful vegan/gluten-free bakers who want that business and I want them to have it. I’ll always hold this memory though, the months and weeks it took to perfect and create a friend’s once-in-a-lifetime dessert. While I never wanted to bake a wedding cake, I can’t say I regret it. I don’t. It was a better gift than I could have bought to buy them and a luscious way, baked with love, to start their married life.
Here’s the recipe:
Ashley & David’s Vegan and Gluten-free Wedding Cake (originally the Halloween Layer Cake)
Makes 45-50 wedding-size cake portions
Dark Chocolate Cake Layers
To prepare four 10-inch cake pans:
Vegan margarine (Earth Balance used)
Black cocoa powder, for dusting pans
Dry Ingredients:
3 cups 1:1 Gluten-Free Flour Blend (King Arthur Flour blend used)
2 cups vegan sugar (Florida Crystal used)
1-1/2 cups black cocoa powder (King Arthur brand used)
1/4 cup almond flour
3 Tablespoons instant coffee powder
3 Tablespoons Ener-G Egg Replacer
1 Tablespoon psyllium husk powder
1 Tablespoons baking soda
Pinch salt
Wet Ingredients:
2-1/2 cups unsweetened plain soy milk, room temperature (Westsoy used)
1-1/2 cups warm water
1/2 cup canola oil
2 Tablespoons apple cider vinegar (Bragg’s used)
2 teaspoons vanilla extract
Preheat oven to 350 degrees.
Grease four 10-inch cake pans with vegan margarine and dust with cocoa powder.
Sift together all dry ingredients in a large mixing bowl. Whisk dry ingredients to further combine and lighten, about 30 strokes. This adds air and makes the cake texture lighter.
In a second bowl, combine all wet ingredients and stir until smooth. Add to dry ingredients and whisk until well combined, about 50-60 strokes.
Pour evenly into prepared cake pans and bake at 350 degrees for 20 minutes, rotating oven rack positions once during baking.
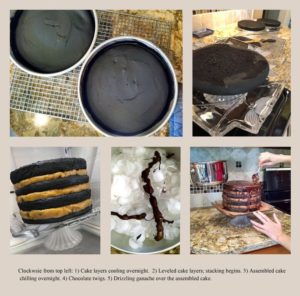
Allow cakes to cool completely, at least four hours and up to overnight in their pans on cooling racks. When ready to trim, the cooled cakes will drop easily from the pans. Handle carefully, so they do not break.
Before assembling with peanut butter candy layer, use a long serrated knife to trim the mounded tops of the cake flat. This step is optional, however, the assembled cake will be unsteady if the layers are not leveled.
Keep those extra cake scraps! They’re delicious crumbled over non-dairy ice cream, added to a chia pudding parfait, or to just munch on them as-is!
Peanut Butter Candy Filling Layer
4 cups creamy/smooth peanut butter, room temperature (not the natural kind, it won’t work!)
2 teaspoons vanilla extract
1 stick vegan margarine, room temperature (Earth Balance used)
3/4 cup unsweetened plain soy milk, room temperature (Westsoy used)
4 cups organic powdered sugar
4 two-packs of vegan dark chocolate peanut butter cups candies (Justin’s used)
Unwrap the peanut butter cups and using a chef’s knife, chop the candies into small pieces on a cutting board, about the size of pebbles. Set aside.
Add peanut butter, vanilla, margarine and soy milk to a large mixing bowl and using an electric mixer, beat until well combined and creamy, about 2-5 minutes. Gradually, sift in one cup of powdered sugar at a time, mixing between each cup to thoroughly blend the filling. When all the powdered sugar is incorporated, scrape in the chopped peanut butter candies. Using a wooden spoon or sturdy spatula, gently fold the candy pieces into the peanut butter filling.
To assemble the cakes, you’ll need the cake plate and food-safe dowels or extra-long lollipop sticks.
First, dollop one heaping teaspoon of the peanut butter filling onto the middle of the cake plate and mash it flat. Carefully transfer the first cake layer and center it on the serving plate, using the peanut butter filling as “glue” to hold it in place.
Next, using three equally sized bowls or working on a counter covered in parchment, separate the remaining peanut butter filling into three identical ratios. Set two portions aside and gently top the first cake layer on the plate with peanut butter candy filling.
Using your hands, carefully mold/flatten the peanut butter layer onto the layer, making sure the top is totally level and the sides are neat with minimal overhang. When you are satisfied with the look of the peanut butter layer, top with another cake layer. Repeat until you have used all the cakes and portions of peanut butter filling. There should be cake on the bottom and top with two layers of cake and three layers of peanut butter filling in the middle. Be sure to build straight up, as a tilted cake is sure to fall during transport.
To secure your cake, use three or four food-safe dowels or extra-long lollipop sticks as “support beams” in the cake. Trim them to match the height of the cake and simply push the rods through all the layers from the top of the cake. This step is optional, but if you plan to move the finished cake, it will give the confection additional strength during the car ride or while being carried. If you plan to serve it outdoors during the summer months, this step is highly recommend.
At this point, stop working and chill the cake overnight in the fridge. Both the cake and peanut butter filling layers will tighten up and become more secure in the cool air.
Chocolate Ganache Topping
One 13.5 ounce can full-fat, unsweetened coconut milk (Native Forest Classic Organic used)
1 teaspoon vanilla extract
Two 9 ounce bags vegan chocolate chips (Enjoy Life Mini Chips used)
In a saucepan over low heat, warm the coconut milk and vanilla together until just simmering, but not boiling. Remove from heat and immediately add all chocolate chips. Stir briskly until they melt into the coconut milk, making a thick, shiny ganache that seems glossy when you look at it in the light. There should not be any lumps of chocolate.
To decorate the cake, remove from fridge and carefully spoon or ladle the ganache over the cake in a way that looks appealing to you. You can use it all, or just what you need. If you used dowels or sticks, be sure to cover the parts on the top where they are visible.
When the ganache is on the cake, place back in the fridge and allow to set, at least 2 hours and up to overnight.
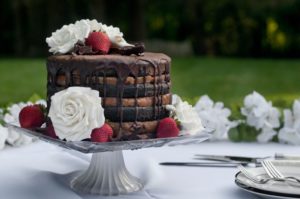
Other cake decorations are up to you! Fresh strawberries, raspberries, and blueberries would all be gorgeous. On Ashley’s cake, fondant roses where used (purchased from an Etsy vendor who makes vegan cake decor), as well as fresh strawberries, a sprinkle of light-toned cocoa and chocolate twigs.
Chocolate twigs are simple to make. Fill a low, flat dish (like a pie pan or cake pan) with ice cubes and set aside. Melt about half a bag of chocolate chips in a microwave on low power for 15 seconds and sit. Repeat the 15 seconds on low power until smooth and liquid. Don’t overcook! Once the chocolate is melted, use a spoon to drizzle long lines of chocolate over the ice cubes. This will create bumpy, irregular chocolate twigs. They will set up almost instantly. Keep chilled.
The finished cake should be refrigerated until ready to serve.


Wow, this cake looks awesome!!!
wow, what a wonderful story and such a good friend.